How To Make A Watercolor Portrait Of Your Home When You Aren’t A Painter
Learn how to make and personalize a watercolor portrait of any image using your phone. A framed image of your home makes a beautiful statement hanging on the wall and makes a great housewarming gift too!

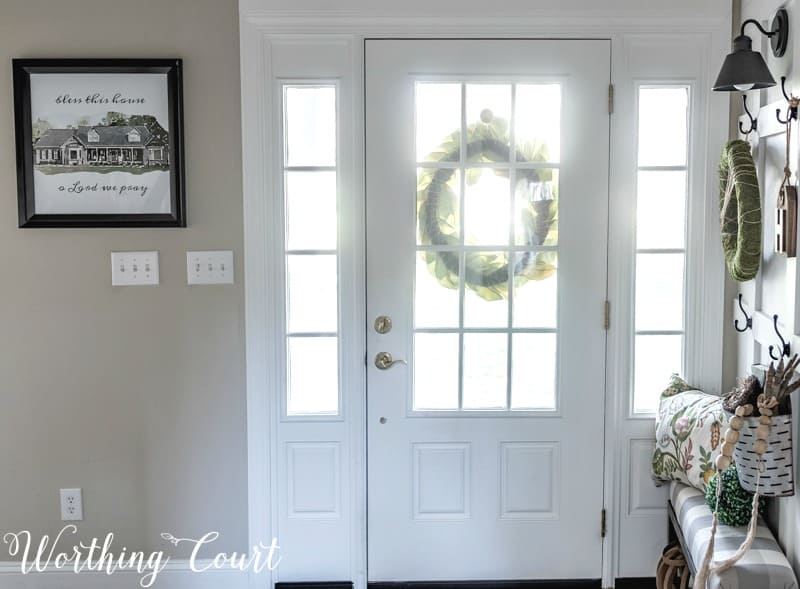
If you saw the final before and after reveal of my foyer makeover, then you’ve already seen my DIY watercolor portrait of the exterior of our house that is hanging right beside our front door. When I created it, I added a little sentiment to it and I just love it hanging right there to greet anyone arriving or leaving.
Here’s the funny thing – when it comes to watercolors, I can’t paint a single stroke. Well, maybe I can use my kindergarten paint set and make a mess of a picture in a coloring book, but that’s about it. But – many of you asked me to show you how you can create a watercolor portrait of your home, so I’m happy to share this tutorial with you (even though I’m not a true watercolor artist). I’m going to show you all the way from taking the initial photo to turning it into a piece of art for your wall.
The Watercolor Tutorial
I’ll go ahead and warn you that this is a long post and the steps may seem complicated, BUT I promise you it’s a very easy process. Simply follow each step and you’ll see what I mean. You’ll find that it becomes easier and faster with repeated use.
Believe it or not, this watercolor-look image was created using an app on my phone – there are watercolor effect apps available for both I Phone and android users.
I have an I Phone, so I used the Waterlogue app , but if you have an android, there’s probably an app for that too (see the next paragraph). If you have an IPhone or an IPad, you need this app – I think it’s the coolest thing ever! It isn’t a free app, but it will be the most fun and rewarding $5 you ever spent. Click HERE to purchase the app using my affiliate link (at no additional cost to you).
Don’t worry – if you have an android instead of an I Phone, visit the Google Play Store and do a search for “waterlogue app for android” to browse the many watercolor effect apps that are offered. Visit the Play Store by clicking HERE. I’m not familiar with the android watercolor apps, but you should still be able to use the rest of this tutorial (starting with Step 5) to create your own watercolor.
Let’s get started.
1. OPEN THE WATERLOGUE APP TO CHOOSE THE IMAGE YOU WANT TO TURN INTO A WATERCOLOR
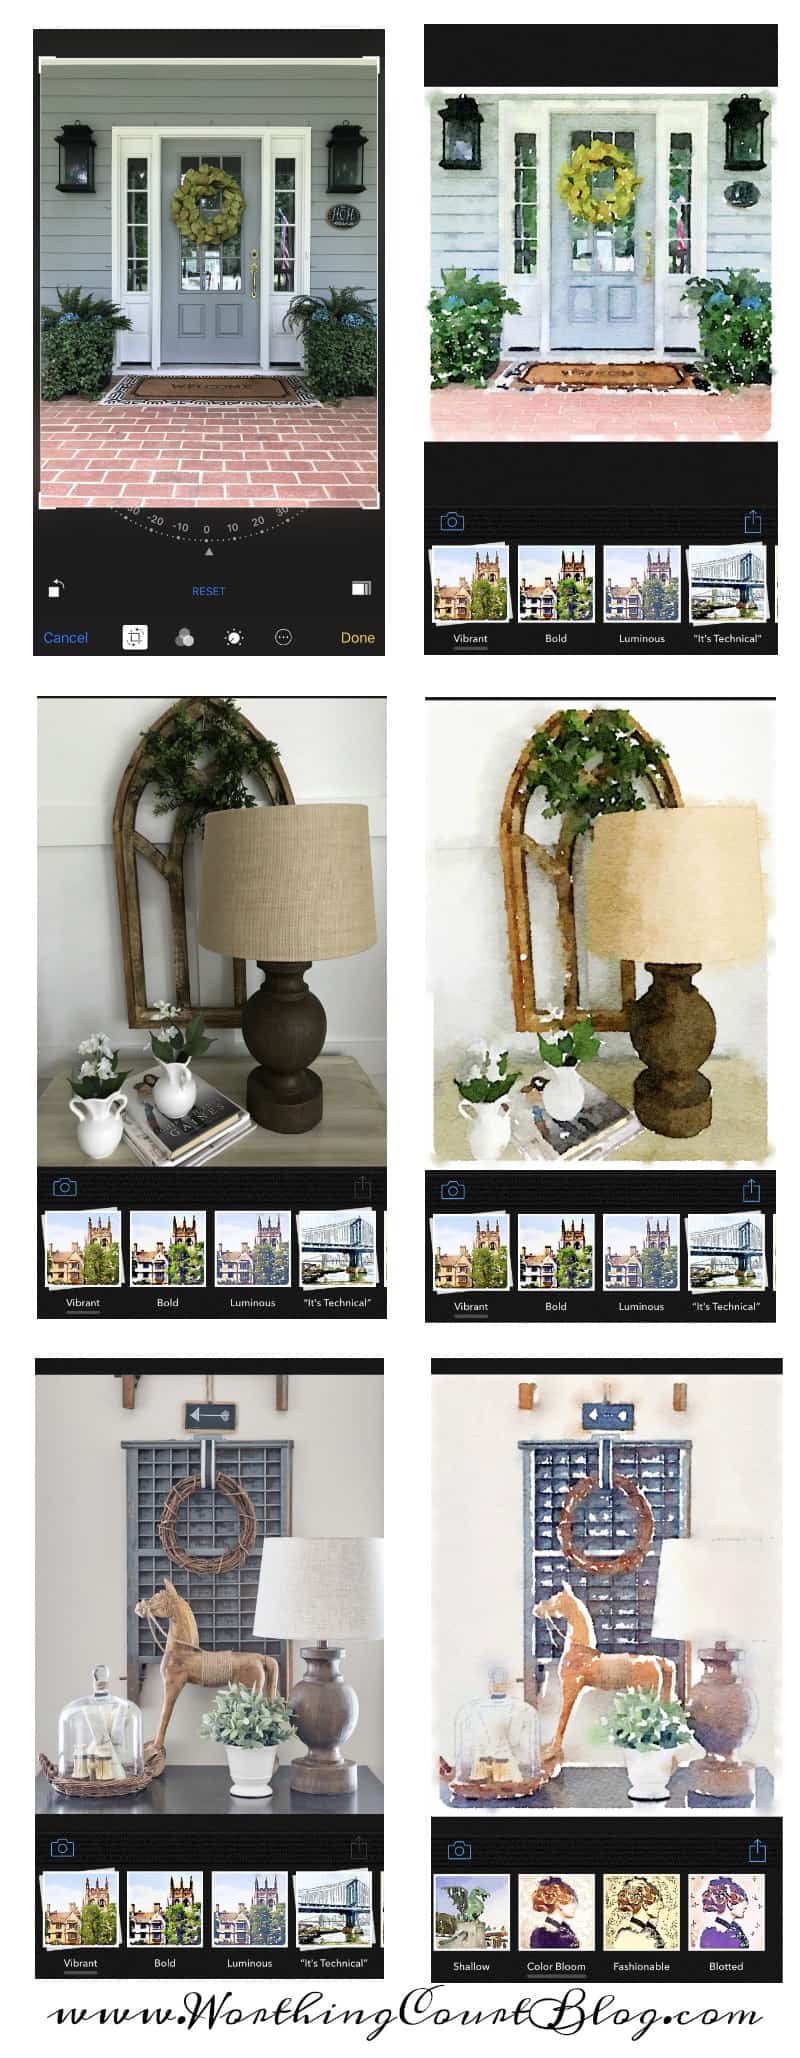
Open the Waterlogue app on your I Phone, click on the camera icon on the lower left. You will be taken to a screen that gives you the option of choosing a picture from your Photo Library or of taking a new photo with your phone.


2. SELECT A PHOTO FROM YOUR LIBRARY OR TAKE A NEW PHOTO
For this example, I clicked on the camera icon to take a photo of the exterior of my home.
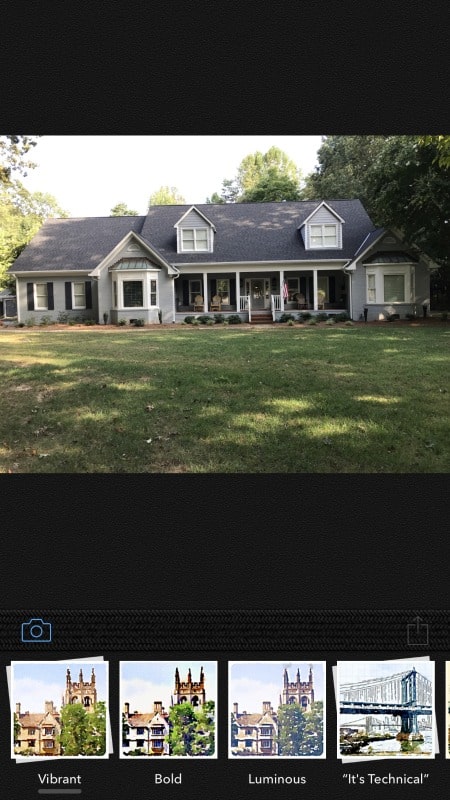
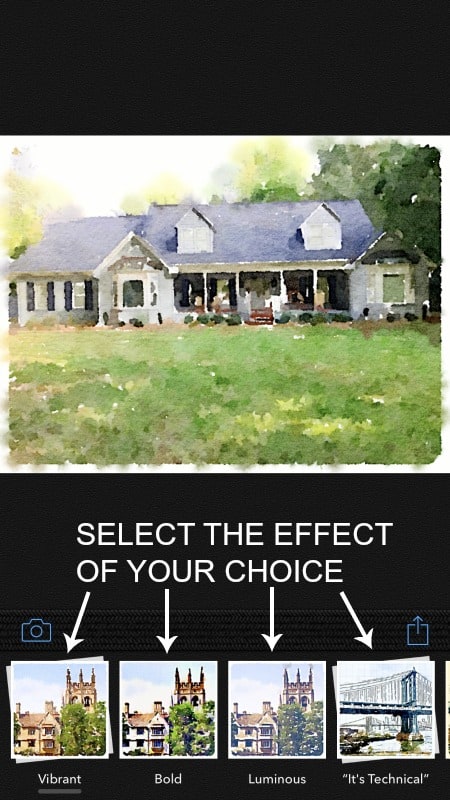
3. SELECT THE WATERCOLOR EFFECT FOR YOUR PHOTO
There are multiple beautiful watercolor effects that you can apply to your photo. Four will show on the main screen, but you can swipe sideways to see more. I almost always use the Vibrant effect. Simply click on the effect that you want to use and watch the magic happen! The photo will transform into a “watercolor” right before your very eyes.
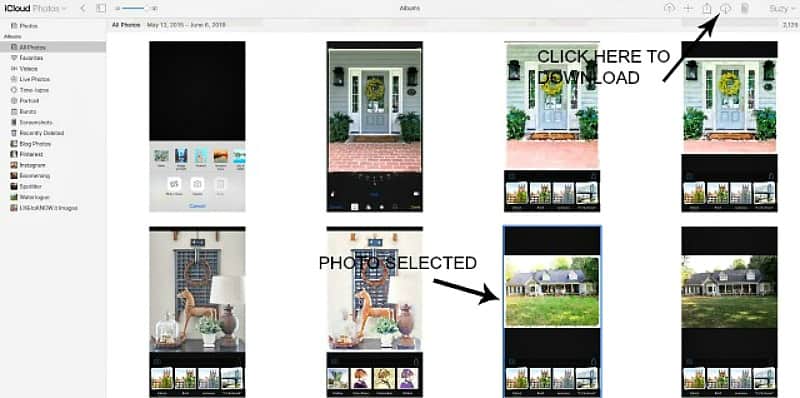
4. DOWNLOAD THE PHOTO TO YOUR COMPUTER
I have the settings on my phone set so that every picture I take with my IPhone automatically uploads to icloud. Using www.icloud.com makes it super easy to move your photos from your phone to your computer. If you don’t have your phone set to automatically do this, you can choose to send the photos to icloud individually by clicking on the upload icon on the lower right, just above the Waterlogue effect choices.
Once in icloud, click on the photo that you want to save to your computer and click on the cloud shaped download icon in the upper right hand corner to save to your computer.
5. USE PICMONKEY TO EDIT AND CREATE YOUR WALL ART
PicMonkey is another fun tool to use to edit your photos or to create printables and graphics from scratch! It’s what I use to create my mood boards too. Get my step-by-step tutorial for creating a mood board by clicking HERE.
BE SURE THAT YOU ARE USING THE OLD VERSION OF PICMONKEY – NOT THE NEW BETA VERSION!
There is a free 7 day trial available, but after that the Basic PicMonkey is $5,99/month, when you allow them to bill you annually. It’s slightly higher if you choose to be billed monthly instead. Click HERE to start your free trial or to purchase a membership using my affiliate link (at no additional cost to you).
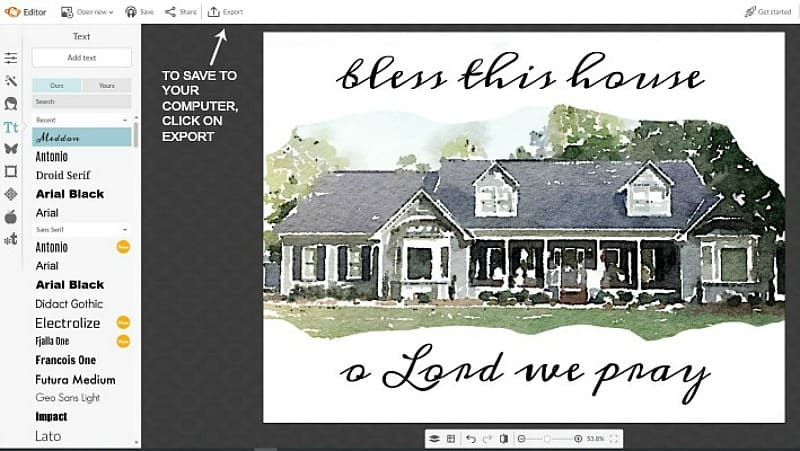
We are going to use your Waterlogue’d photo to create an overlay that can go on a white background to create your piece of artwork. Go to www.picmonkey.com, log in and click on DESIGN to bring up a screen that says “Enter a custom canvas size”. In the white boxes, enter the number of pixels high and pixels wide that you want your custom image to be then click on MAKE IT.
The size is in pixels, not inches. If you aren’t sure how many pixels high and wide your image should be click HERE for a handy pixel to inches converter. You’ll have to select resolution/print quality too – for this project, I suggest using 200 DPI.
I needed an image that measureed 20″ x 20″ to fit my frame, so I entered 4000 and 4000 in each of the white boxes.

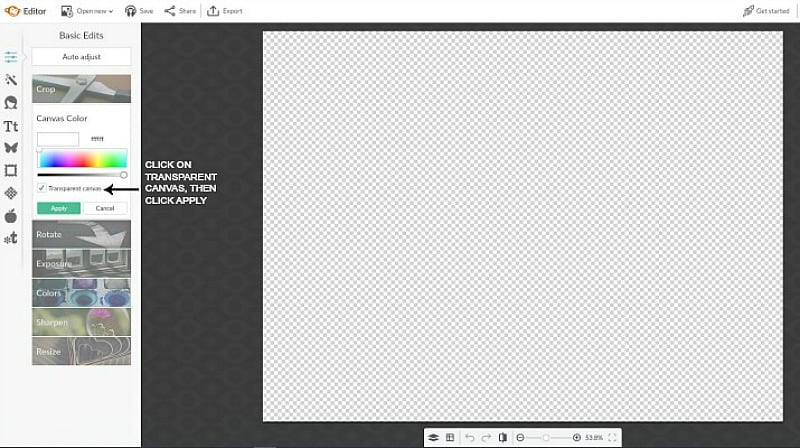
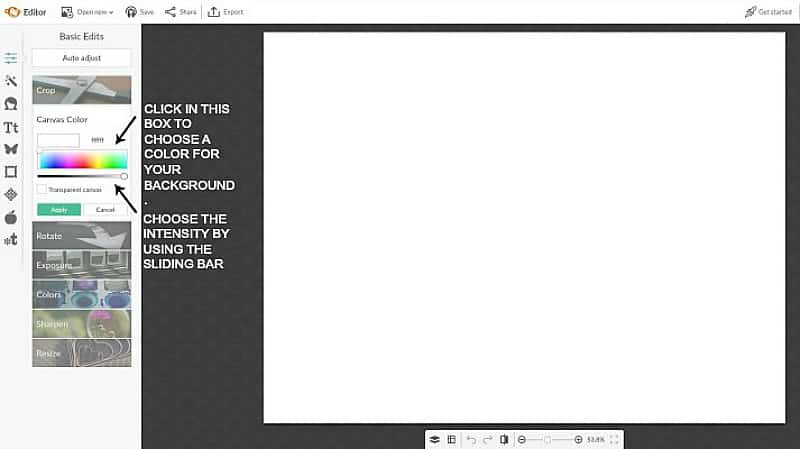
6. SELECT THE BACKGROUND
When your custom size image opens in PicMonkey, it will automatically ask you to choose the color of your background. We want a transparent image, so click the little box beside “Transparent Canvas”. Then click on “Apply”.
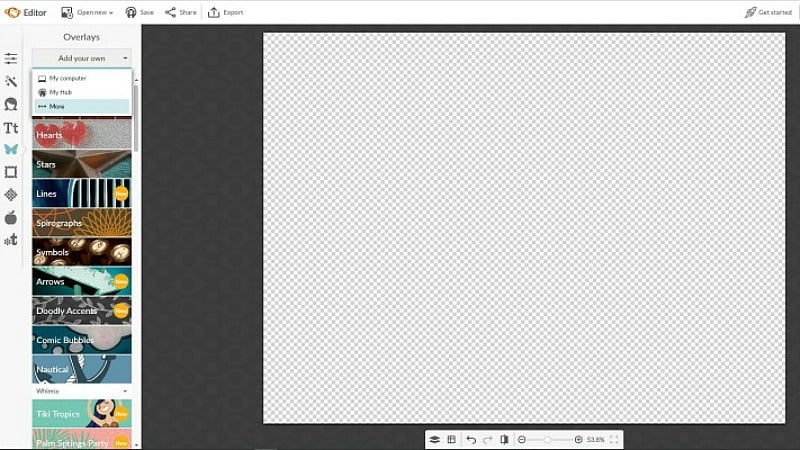
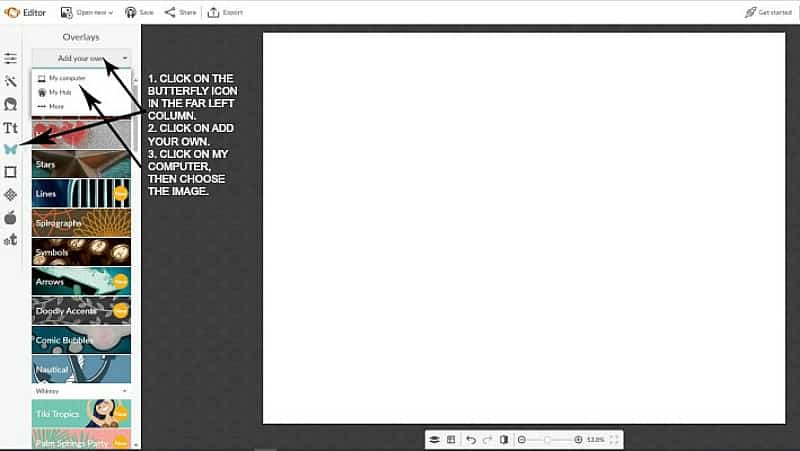
7. ADD YOUR WATERLOGUE IMAGE AS AN OVERLAY
Now you want to add your Waterlogue image on top of the transparent background. Click on the butterfly icon in the far left column to choose the image that you saved to your computer. Then click on “Add Your Own” at the top of the column that is right under the word “Overlays”. A drop down menu will appear, where you should choose “My computer”. Find the image that you downloaded to your computer and select it.
8. EDIT THE WATERLOGUE IMAGE
Now that the Waterlogue image has been laid on top of the transparent background, you’re ready to start customizing.
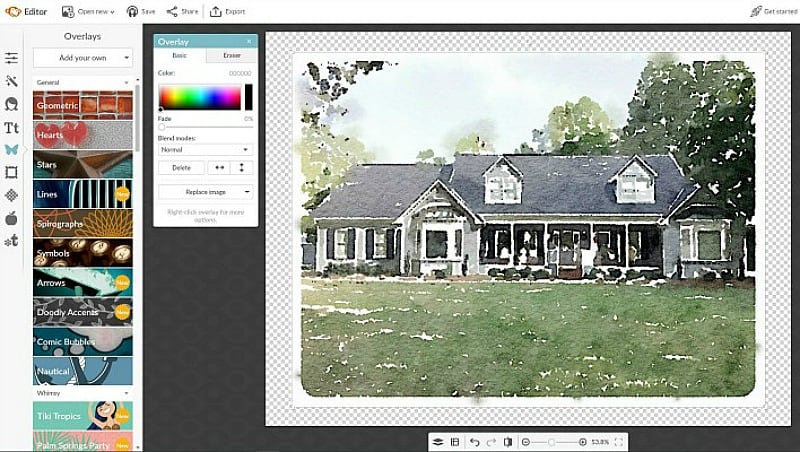
Since I wanted to add text both above and below the Waterlogue image, I needed to erase part of the overlay by clicking on the Eraser tab located on the upper right hand side of the Overlay box. Adjust the “eraser” size based on the amount that you want to erase from your overlay image. When erasing some of my image, I kept in mind that I wanted rounded edges, not sharp corners. Simply click on the image and start moving/dragging the eraser over the areas you want gone and watch them disappear.
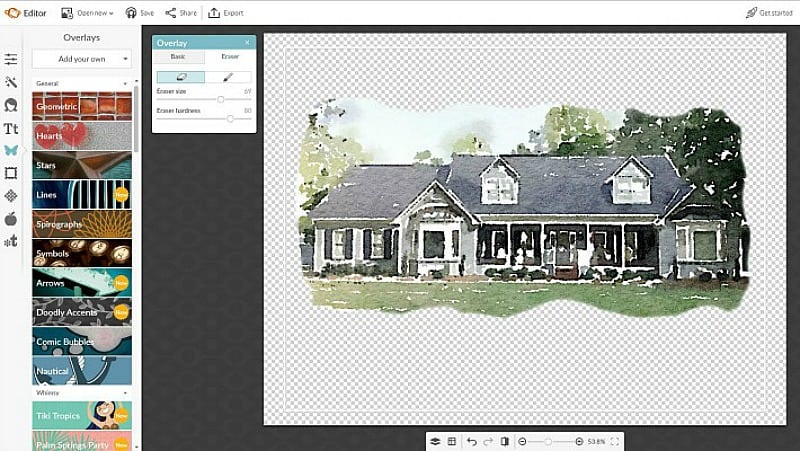
This first photo is of my image partially erased.

The second image is where I’ve fully erased everything that I wanted to. When you’ve completed editing your image, click on EXPORT located in the menu bar and save this edited image to your computer.
9. CREATE THE BACKGROUND FOR YOUR EDITED WATERLOGUE IMAGE.
Now you are going to create the background for the edited image. Repeat Step 5, using the same 4000 x 4000 pixels dimensions.
Repeat Step 6, except do not click the Transparent Canvas box – you need to choose a color that you want your background to be. You can choose any color for your background by clicking on it in the color graph – I chose a white background for mine. Be sure to click Apply once you’ve made your choice.
10. ADD YOUR EDITED WATERLOGUE IMAGE AS AN OVERLAY
Remember the editing that you did to your Waterlogue image in Steps 5 through 8? Now you’re going to use that image as an overlay on the background that you just created in Step 9.
Click on the butterfly icon in the far left column to choose the image that you saved to your computer. Then click on “Add Your Own” at the top of the column, located right under the word “Overlays”. A drop down menu will appear, where you should choose “My computer”. Find the image on your computer and select it.
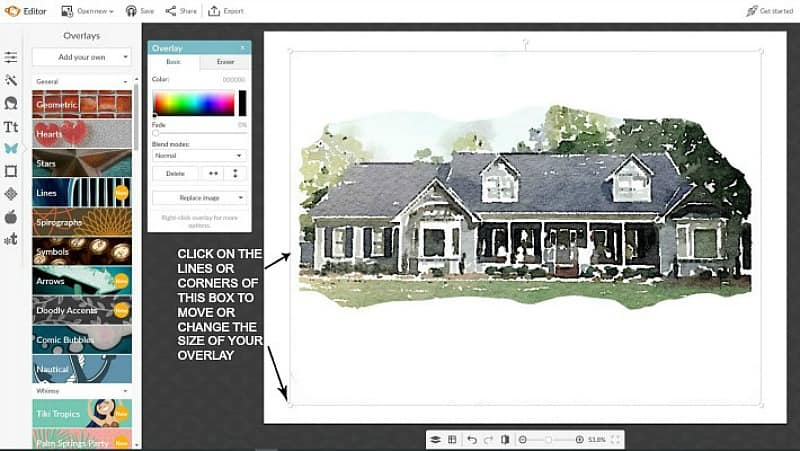
11. LOCATE & SIZE THE NEW OVERLAY TO FIT THE BACKGROUND
Now that you’ve added the edited Waterlogue image as an overlay on your background, you can drag it around to locate it where you want it to be on your background. For example, I knew that I was going to be adding text both above and below my image, so I made sure to take that into account when I centered it on my background.
To move the entire overlay around and/or to shrink or increase the size of it, click on the overlay, then click on the lines or corners of the box that surrounds the overlay once you’ve clicked on it.
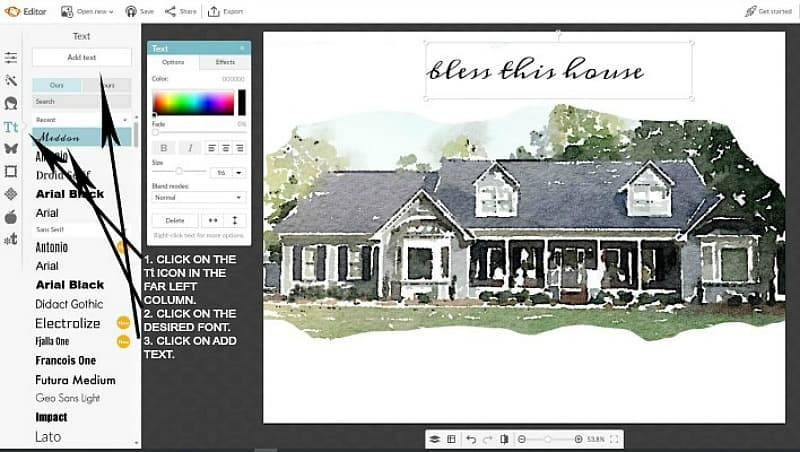
12. ADD DESIRED TEXT TO THE BACKGROUND
If you desire, you can easily add text the the image that you just created. To do so, click on the Tt icon in the far left column, click on the name of the font that you want to use and select “Add Text”, which is at the top of the column.
An empty box will appear somewhere on your image. Click inside the box to type the text that you want to add. To drag the text to a different location, click out of the box, then click back in, click and hold to drag the box where you want the text to appear. You can also increase the size of the text by clicking on the sides or corners of the box.
13. SAVE & PRINT YOUR FINISHED ARTWORK
Now that my image is completed, I saved the finished image to my computer. To have the image printed (since it’s larger than a normal piece of printer paper), you can either save the image to a thumbdrive and take to your local office supply store for printing or you can use their website to send the image to them electronically. I prefer to take it to them myself so that I can be sure they understand what I want and so that I can preview what the finished image will look like. (I know that FedEx lets me see the preview – I’m not sure about Staples or other stores.)
14. ENJOY YOUR COMPLETED MASTERPIECE!
You may think that just because you didn’t actually paint the picture that it isn’t a “work of art”, but I disagree. You may not have applied brush and paint to paper, but there is still quite a bit of creativity involved.

With the Waterlogue app, you can create a watercolor image of virtually anything! Look at the examples below and think about how cute one of them would be displayed in a small frame somewhere.
Have fun Waterlogue’ing and let me know in the comments if you have any additional questions!
Love this idea. It will make a great gift for my mom. Thanks for sharing all the details.
I would love to do this. You’re right, it would make a great housewarming gift. Thanks for the step by step instructions!
Love the app. I downloaded it as soon as I saw your description of it and started taking pictures. The pics will be great for gifts and notecards. I cannot wait to take some pictures of my granddaughters and grandson and share them with their parents. I also love the idea of the picture of the house.
Thank you, thank you, thank you for this tutorial. I can’t wait to do this for my home I just built. What a great idea!
I actually can paint, but who has the time…and this looks like so much more fun!! I am totally going to invest in the app, especially since I already pay for PicMonkey. Thanks for the awesome step by step. Off to “paint” some pictures! 😉
Wonderful post! THank you so much for posting this one. You’ve really gotten my creative juices flowing! 🙂
Very fun, and beautiful! Thanks for sharing this with us, Suzy!
Love this and great tutorial
I love this app! I have used it for a couple of years now and have created portraits of our granddaughters that are so unique and precious!
How timely! I got PicMonkey to add a watermark to my engagement photos, and I just got Waterlogue to make watercolours out of a pic of my house, and some of my wedding photos. Just learning how to use both, so I followed your instructions and made a lovely welcome sign out of my house watercolour. Wish I could show you, but I don’t know how/if I can upload to the comments. Your house is beautiful, by the way! Thanks for the tutorial!
Hi Tracy. I love hearing that my tutorial worked for you and I’d love to see what you did! If you’d like to, you can email it to me at worthingcourtblog@gmail.com.
Dear Suzy,
I feel so lucky to have found your blog. You must be my soul sister. I love everything! I just finished my house watercolor and have ordered the canvas. I cannot wait to pick it up next week. Your instructions were the best. I am so in love with picmonkey! Thanks for all your great ideas! Have a wonderful July 4th!
Hi Connie. I’d love for you to email me a photo of your watercolor on canvas after you receive it. If would like to, you can send it to worthingcourtblog@gmail.com.
I made a Waterlogue picture of my daughters house, had it printed and gave it to her for Christmas. She loved it and was impressed with her Mother’s talent!
Picmonkey website has changed. Its tough to follow the instructions since the site was changed. Do you have new updated instructions for this? I am anxious to work on this project!
PicMonkey now has a new Beta version, which is what you’re probably seeing. These directions apply to the old version. When you’re on the PicMonkey home screen, look to the right side of your screen and click on the arrow beside the round button that says “BETA”. You should be able to choose the old version. Hope this helps!
Suzy, on Waterlogue as you scroll to the right, it says small, medium, large and giant with a ruler. Which did you select for your house? I’m having fun creating a Christmas gift!
My apologies for not replying sooner! I’m having a technical difficulty that’s been preventing from being notified of new comments. I didn’t select any of those.
I love this watercolor painting of your house. I think I’ll try it. however, I’ll wait until my roses are in full bloom so there will be lots of color in front of my porch. thank you so much for sharing.